Introducing JSX
Remember Your First Website? - Ah, the good ol’ days!
Remember when you first ventured into web development? You proudly created your index.html file, slapped on an index.css, and thought, “Wow, this is basically a masterpiece!” Maybe you even threw in an index.js to get fancy with a button that didn’t quite work, but hey, it changed something on the page!
<!DOCTYPE html> <html lang="en"> <meta charset="UTF-8"> <title>It's been a long time...</title> <link rel="stylesheet" href="./index.css"> <body> <div> <h1>Hello world</h1> <input type="text" placeholder="My Text Input"/> </div> </body> </html>
body { /* Super fancy styles */ background-color: red; color: green; } /* Styles for SaFarI */ body { -webkit-background-color: red; }
Fast forward to today - introducing JSX for UIX. With JSX, you can throw your old .html files into the digital attic. JSX takes all that nostalgia and cranks it up to 11 by letting you write HTML-like code directly in JavaScript / TypeScript!
If you plan to use JSX syntax inside of your UIX app, make sure to change your file’s extension from .ts to .tsx.
All DOM elements (e.g. <div>, <p>, <img>, <svg>, …) can now be used within your TypeScript code as it was HTML:
// That's magic, isn't it?
const myDiv = <div>Hello world</div>;
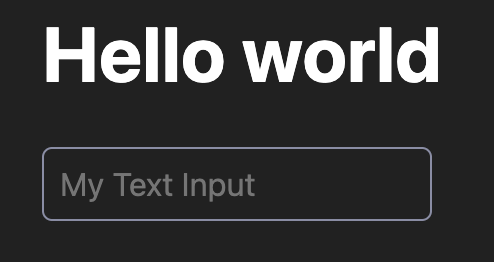
Alright, let’s see an example in how to render something in our entrypoint.tsx that we can acutally see in the browser. For that we can just set our default export to some JSX element:
export default ( <div> <h1>Hello world</h1> <input type="text" placeholder="My Text Input" /> </div> );
Voilà, we’ll see something like below when we run UIX and open the app in our browser (styles are of course a bit off when using IE or SaFarI):
Creating and handling DOMElements
If you’ve ever used React, you’re probably familiar with the concept of the Virtual DOM — a lightweight, in-memory representation of the actual DOM that React uses to efficiently manage UI updates. However, in UIX, every JSX expressions returns real DOM elements, not virtual representations.
That means that value returned by following JSX expression is an actual instance of an HTMLSpanElement and we can use it as it was created by document.createElement('span') to modify properties or change its children.
const mySpan = <span>Hello, UIX!</span>;
// Do whatever we want with the element
mySpan.innerText = "Some other text";
document.body.append(mySpan);
UIX support a custom JSX flavour that is as close to original HTML as possible. That means we can set all common attributes for DOMElements (e.g. id, class, style, and event handlers) as we would do in HTML.
document.body.append(<div id="myDiv">Hello, UIX!</div>);
document.getElementById("myDiv").innerText = "Some other text";
Reusable Components
So we covered the basics. Let’s continue with reusable components - what is where JSX comes in super handy. Think of reusable components like the building blocks of your UIX app. Instead of recreating similar buttons, list items, forms, or navigation menus over and over again, you can design a single component that can be used repeatedly with different data or styles. This reduces code duplication, makes your project more scalable, and simplifies maintenance.
Let’s create a reusable button component (WIP)
function MyButton() {
  return <button class="my-button">I'm a button</button>;
}
Help us improving our docs
Our documentations are fully open source. Something is wrong or unclear?